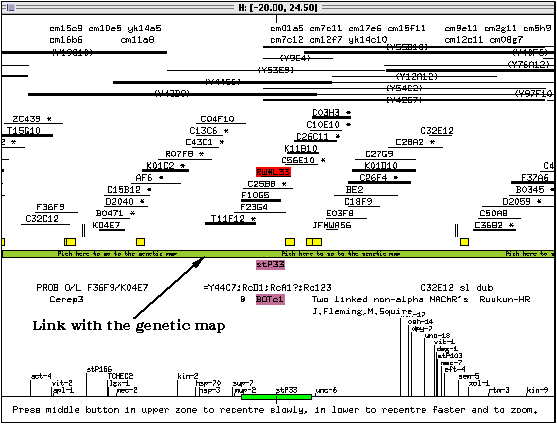
When the physical map appears, it is centered on the marker which was selected in the genetic map (in this case, stP33). On colour systems, the name of the clone this marker was located to is highlighted in red, and other items of information connected to it are shown in pink (or purple, depending on the colour display). The title bar of the window lists the region of the chromosome currently displayed on the screen.
Note: because of the window size, it may be compressed on some systems with limited screen space, and some objects may overlap.
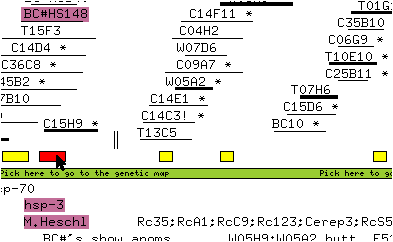
The screen is divided by a green bar. Double-clicking on this bar will open the genetic map window. Clicking once on an item in the window will select this item: the item will be highlighted in red and related items will be highlighted in pink. Double-clicking on an item will bring up a text window with information on this item.
The layout of the physical map window is divided into sections (indicated by numbers at the right of the following figure):
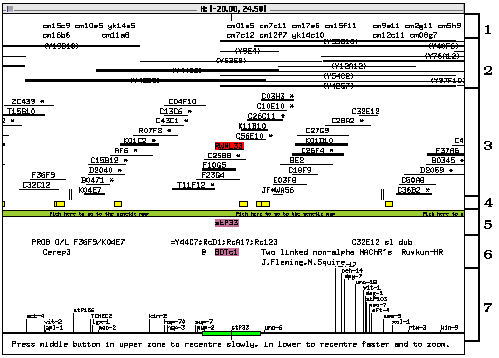
1: This section, just below the title bar, lists the clones whose location was determined by hybridization to filter-bound YAC clones.
Note: the location of these clones may not be definitive as in some cases a given clone will hybridize to several places in the genome, presumably because of sequence similarities. A list of the YACs a given clone hybridizes to can be seen by double-clicking on the clone name.
2: This section contains a series of horizontal lines identified by a label in parentheses at the centre of the line. These lines represent the YAC clones spanning the region currently displayed.
3: The short horizontal lines in this section represent cosmid clones. Some are marked with an asterisk: they are canonical clones, which represent a set of identical or near identical clones. Double-clicking on a `canonical' clone lists the hidden (or `buried') clones it represents together with other information. Cosmids represented by a thicker line (e.g. F10G5) are (or are canonical for) clones which have been used to determine the positions of the YAC clones by hybridization.
Note: the hidden clones can also be displayed using the Show All Buried Clones option in the pop-up menu.
4: The small boxes in this section (just above the green bar) represent sequences associated with some of the clones in the contig.
5: The genetic markers located at this portion of the chromosome are listed in this section, just under the green bar. The gene name is positioned so that its first letter lines up with the first letter of the name of its clone of origin (e.g., stP33 and RW#L33, which is not visible in the above figure but should be highlighted in red on a colour screen).
6: This section contains selected remarks and comments about particular regions of the physical map. The remarks are aligned with the name of the clone they apply to (and any relevant gene name). A number of remarks which were considered of little interest to most users are not shown in the window, but can be displayed by selecting Show All Remarks in the pop-up menu.
7: The bottom part of the window contains a miniature view of the contig, with the genetic markers serving as points of reference. The green slider represents the region currently displayed in the physical map window. The slider is analogous to the locator in the genetic map, and can be used to select a new region of the physical map to display.
* Position the mouse cursor on or near the green slider.
* Press and hold the middle mouse button.
Two parallel vertical lines appear on the screen around the mouse pointer. These lines define a `window' of the physical map to be displayed: the portion of the miniature contig view lying between these lines represent the portion of the physical map which will be seen in the upper part of the window when the mouse button is released. While the middle mouse button is depressed, horizontal movements of the mouse pointer translate into movements of the window along the contig, and vertical movements widen or narrow the window, therefore reducing or magnifying the selected portion of the physical map.
* Move the mouse pointer to the left and up so that the window defined by the two lines is centered on sup-7 and is about twice the size of the green slider.

* Release the mouse button.
The window is redrawn at about half its original magnification and with sup-7 at the centre.
* Click on the physical map window with the rightmost mouse button and select Set Zoom in the pop-up menu.
A new window prompts you for a magnification value.
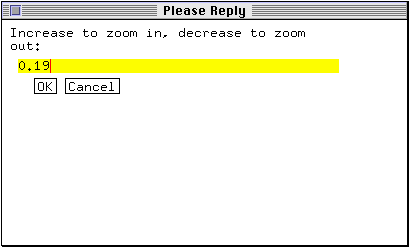
* Enter 0.4 as the new magnification value and click OK.
The physical map is redrawn at higher magnification.
* Position the mouse pointer in the upper portion of the screen then press and hold down the middle mouse button.
A single line appears on the screen at the location of the mouse pointer. This line is used for fine recentering of the map.
* Move the mouse to position the line in the middle of the clone T07H6.
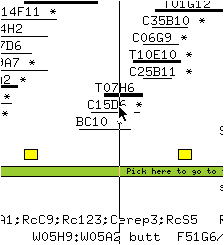
* Release the mouse button.
The map is now centered on T07H6.
* Double-click on the yellow box above the name hsp-3 (on the left side of the window) to bring up the sequence window associated with this sequence.
return to Table of Contents
next section: The sequence window