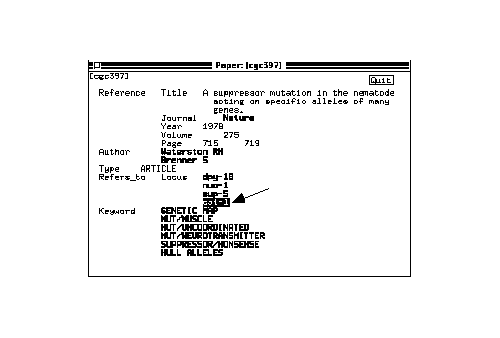
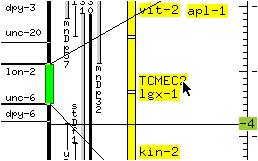
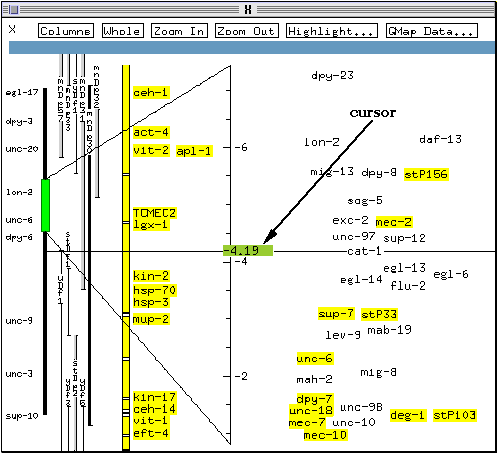
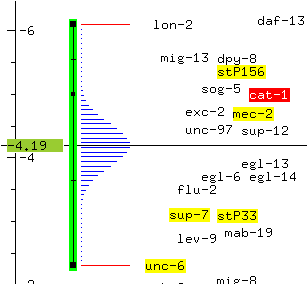
A new window opens, displaying graphically the location of this gene in the genetic map of its chromosome of origin (in this case, chromosome X).

The right hand side of the map lists the genetic markers in this region of the chromosome. The position of these markers on the chromosome as determined using linkage analysis is indicated by their vertical positioning (relative to the scale bar). Their horizontal position gives an indication of the confidence with which the map position is known. The further to the left a marker is in this window, the more certain its position on the genetic map. For example, in this case, the position of egl-14 is known with more confidence than that of flu-2.
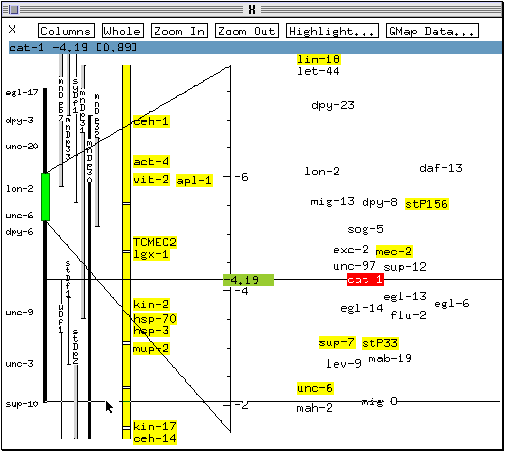
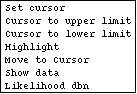
The currently selected gene (cat-1) is highlighted in red, and markers assigned to a clone in the physical map are shown with a yellow background (e.g., sup-7 and stP33). Information on the currently selected object is displayed at the top of the window (highlighted in blue on colour systems). In this case, since a locus is selected, the position of the locus on the chromosome is given.
A cursor is present on the scale bar. On colour screens, it appears as a green box labelled with a number indicating its current position (on monochrome screens, only the number may be visible). A horizontal line running across the screen marks the current cursor position. The function of the cursor will be demonstrated later on in the tutorial.
Note: marker positioning may not be very accurate: ACeDB does not overlap marker names, and, when the map is crowded, moves the names slightly horizontally or vertically to make them fit better. This effect is reduced or eliminated when the view is magnified using the Zoom In button. It is therefore a good idea to examine markers of interest in close view.
* Double-click on the marker name cat-1.
This brings up a new text window containing the known information about this marker.
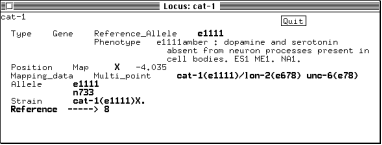
All the information linked to this marker can be accessed from this window by double-clicking on the appropriate entry (in bold type).
* Click on the Quit button to return to the genetic map.
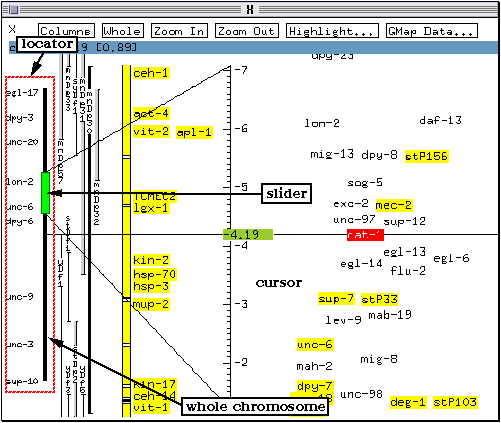
Rapid movement along the chromosome is achieved using the locator on the left side of the genetic map. The locator consists of a black bar representing the whole chromosome and of a slider (green on colour systems) which corresponds to the portion of the chromosome currently displayed. A few genetic loci are marked along the locator to give a rough indication of the current slider position.
The slider can be dragged along the black bar using the lefmost mouse button to move along the chromosome.
* Click on the slider with the left mouse button and drag it down (without releasing the mouse button) so it is centered on the locus unc-9 (written on the left side of the locator).
* Release the mouse button.
The map now shows the portion of the chromosome around locus unc-9.
* Drag the slider back to its original position (centered approximately between lon-2 and unc-6).
The locator can also be used to control the magnification of the display.
* Click on the left side of the locator slider with the middle mouse button and keep the button depressed.
Two parallel horizontal lines appear on the screen at the ends of the slider. These lines define a `window' of the genetic map to be displayed: the portion of the chromosome lying between these lines represent the portion of the genetic map which will be seen in the right part of the window when the mouse button is released. While the middle mouse button is depressed, vertical movements of the mouse pointer translate into movements of the window along the chromosome, and horizontal movements widen or narrow the window, therefore reducing or magnifying the selected portion of the genetic map.
* Move the mouse pointer right and left without releasing the middle mouse button to see the effect of the movements on the horizontal lines.
Moving the pointer to the left of the slider brings the lines closer together, therefore `zooming into' the display. Moving the pointer to the right of the slider `zooms out' of the display.
* Position the mouse pointer to the right of the slider so the horizontal lines are separated by approximately twice the length of the slider, and release the mouse button.
The genetic map display is reduced by a factor of about 2. The size of the slider changes to reflect the change in size of the portion of the chromosome now displayed on the screen.
The map magnification is also controlled by the buttons Zoom In, Zoom Out and Whole at the top of the window.
* Click on the Zoom In button.
This brings the magnification back to around its original value.
Note: clicking on the Whole button zooms out to show the whole chromosome and all its loci.
Precise movement along the chromosome is possible using the middle mouse button.
* Click anywhere to the right of the locator with the middle mouse button and keep this button depressed.
A horizontal bar appears under the mouse pointer. This line indicates where the map will be recentered when the slider is released.
* Drag the line down to the marker mig-8 and release the mouse button.
The map is redrawn, vertically centered on mig-8.
* Use the middle mouse button to center the map back on cat-1.
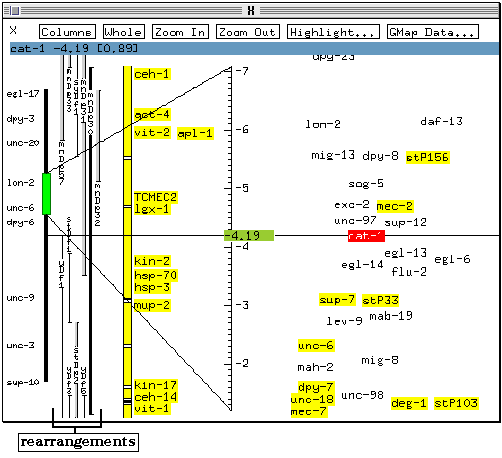
The vertical bars between the coarse control slider and the yellow bar represent known chromosomal rearrangements. On colour systems, it is possible to distinguish between deletion rearrangements which appear as a single line and duplications which are shown as a thicker bar or as a thin bar with a light grey `shadow' (the `shadow' may not be visible on monochrome screens).
* Click once on one of the rearrangement bars with the leftmost mouse button.
The selected rearrangement is highlighted in red and relevant information (name and location of its ends) appears at the top of the screen in blue highlight.
* Double-click on a rearrangement bar.
A new text window appears with information about this rearrangement and links (in bold type) to other windows containing further information.
* Click on the Quit button to return to the genetic map.
It is possible to review some of the genetic data underlying the map using the GMap Data... button.
* Try clicking (once) on the various rearrangements until the one called mnDp32 is highlighted.
* Click on the GMap Data... button with the leftmost mouse button.
On colour systems, this highlights a few markers. Those highlighted in green (e.g., dpy-8 in this case) are those genes known to map inside the rearrangement boundaries. The genes known to map outside the rearrangement boundaries are highlighted in blue (mec-2 for example in this case).

* Click once on the marker name egl-14 to select it.
The selected gene is highlighted in red on colour systems.
* Click on the GMap Data... button.
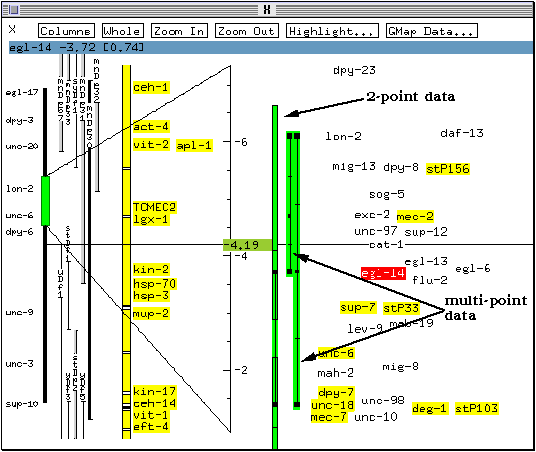
A graphical representation of the mapping data available for this marker appears. Both 2-point data (calculated from the observed recombination frequency between a pair of markers) and multipoint data (obtained by analysing the inheritance of three or more markers) are shown. In this case, the position of egl-14 was deduced from one two-point mapping and two multipoint mapping experiments.
* Click once on the bar representing the results of the two-point mapping experiment.
A one-line summary of the data is presented at the top of the window. Double-clicking on a mapping data bar brings up a text window describing the mapping data.
The two-point and multipoint data bars show how closely the experimental data match the overall genetic map. The markers themselves are represented by small black squares whose position indicates the most likely marker location, as calculated using all the available data.
For each two-point data bar, the genetic distance between these markers which was calculated using only the data from this particular experimental cross is indicated using short horizontal lines. This distance may not necessarily agree with the overall data. Confidence intervals for the two-point data are indicated by rectangles.
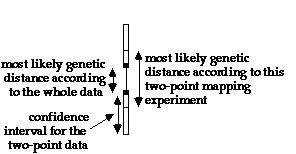
For example, in the above figure, the 2-point data linking the two markers predicts a distance between these markers which is higher than that calculated by taking the whole genetic map into account (the distance between the horizontal lines is larger than the distance between the two black squares).
For multipoint mapping data, only the marker order predicted by the experimental data is shown.
* Click on the marker mec-2 with the leftmost mouse button to select it, then click on the Gmap data... button.
The mapping data used to position mec-2 on the genetic map is shown, highlighted in green on colour screens. The previously displayed mapping data (for egl-13) remain on the screen, but is not highlighted.
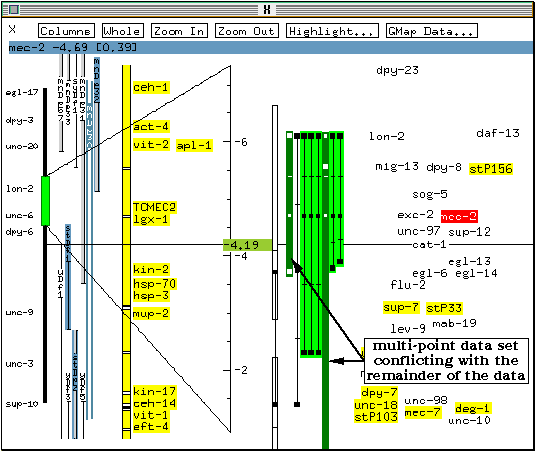
One of the multipoint data bars for mec-2 is shown in dark (dark green on colour screens). This bar corresponds to a multipoint mapping experiment which predicted a marker order contradicting the remainder of the data.
Note: on colour screens, some rearrangement bars may become highlighted when the genetic mapping data for a marker are displayed. This indicates rearrangements which are known to cover or not to cover the selected gene: the rearrangements covering the gene are highlighted in green and the rearrangements not covering it are highlighted in blue.
* Click on the Gmap data... button with the right mouse button.
This opens a pop-up menu offering access to some of the advanced features of the genetic map display.
* Select the top menu item (Clear Map Data).
The two-point and multipoint data bars are erased.
The button labelled Highlight... is used to highlight or to hide specific features of the genetic map window. It is best used in conjunction with the main ACeDB window.
* Bring the main ACeDB window to the foreground (do not quit the genetic map).
* Click on the Template box and type ca* (do not press <return>).

* Double-click on the class name Gene.
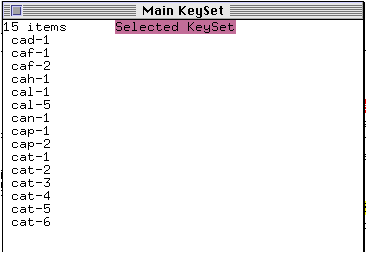
The Main Keyset window comes to the foreground and lists those genes with a name starting with `ca'. The window indicates that this list is the current `selected keyset'.
* Bring the genetic map window back to the foreground and click on the Highlight button with the right mouse button.
A new menu opens:
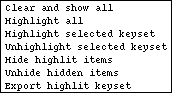
* Select Highlight selected keyset.
The marker name cat-1 (the only one in the current view in the list in the Main Keyset window) is highlighted in magenta.
* Select Hide highlit items in the Highlight... menu.
The marker cat-1 is now invisible.
* Select Unhide hidden items in the Highlight... menu.
Cat-1 reappears.
* Open the Highlight... menu and select Highlight all.
* Select Unhighlight selected keyset.
This time, all items in the genetic map are highlighted except for cat-1.
* Select Hide highlit items in the Highlight... menu.
All the highlighted features disappear, leaving only cat-1 in the genetic map.
* Open the Highlight... menu and select Clear and show all.
This restores the default view showing all markers.
Note: the Highlight... menu is especially useful to highlight the markers retrieved using the Query facility of ACeDB, which will be demonstrated later.
The genetic maps presented by ACeDB show the arrangement of markers along the chromosomes which best fit the overall data. Users without database editor privileges cannot alter these genetic maps permanently. However, it is possible to `move' markers experimentally. Before moving a marker, the new position must be specified using the cursor.
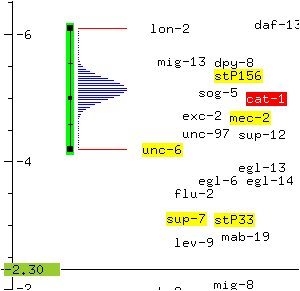
* Click on the cursor with the left mouse button and drag it up the scale bar to position -5 approximately.
* Click on the marker cat-1 with the right mouse button.
A submenu appears:
This menu can be used to move the cursor, either to the location of the marker (Set cursor) or to the upper or lower limits of the marker's range of likely locations, for those markers whose position is not precisely known (Cursor to upper limit and Cursor to lower limit). The submenu can also be used to highlight the marker (Highlight), move it to the current cursor position (Move to cursor) or show its genetic map data (Show data, which is equivalent to clicking on the Gmap data... button with the left mouse button). The last menu item, Likelihood dbn, plots a graph showing the likelihood distribution of where the marker may be located on the chromosome, based on all the map data.
* Select Move to cursor.
The marker cat-1 and the cursor exchange locations (this provides an easy way to return the displaced marker to its original location if desired, by selecting Move to cursor again).
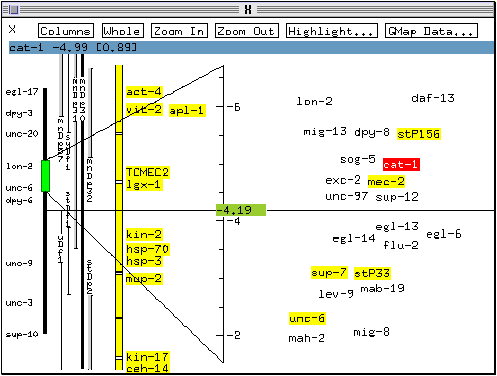
* Click on cat-1 again with the right mouse button and select Likelihood dbn.
A graph of the likelihood distribution for the location of cat-1 appears on the genetic map. The graph indicates that the marker's previous location was the most likely given the available linkage data.
* Click on cat-1 with the right mouse button and select the menu option Show data.
The mapping data used to determine the location of cat-1 is displayed. In this case, the position of cat-1 was determined using a three-point mapping experiment which linked cat-1 to the markers lon-2 and unc-6.
* Click on unc-6 with the rightmost mouse button and select the menu option Move to cursor.
The cursor and unc-6 exchange positions. Since the position of cat-1 was calculated in relation to the position of unc-6, the likelihood distribution curve for cat-1 is altered.
* Click on Gmap data... with the rightmost mouse button and select the menu option Clear Map Data.
* Click on a blank spot in the genetic map with the rightmost mouse button.
A new submenu appears, containing some standard option such as Quit and Help.
* Select the menu option Recalculate.
This recalculates the genetic map from all the available mapping data. The markers unc-6 and cat-1 are moved back to their original locations.
The genetic map display offers a way to `filter' the type of information shown on the screen. This feature can be useful when the genetic map display gets very crowded.
* Click on the Columns button at the top of the window.
A list of the different types of information which can be displayed in the genetic map window appears.
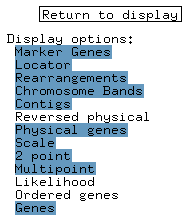
The highlighted items (in blue on colour screens) are those which are to be displayed on the screen, either by default (e.g. the locator, the rearrangement bars, the scale bar and the genes), or if the appropriate command is issued (e.g. 2 point and multipoint data). The display of the various types of objects can be toggled on and off by clicking on the list.
Note: the highlighting may not be visible on monochrome screens.
* Click on Rearrangements to `unselect' it.
* Click on Return to display.
The rearrangement bars no longer appear in the physical map display.
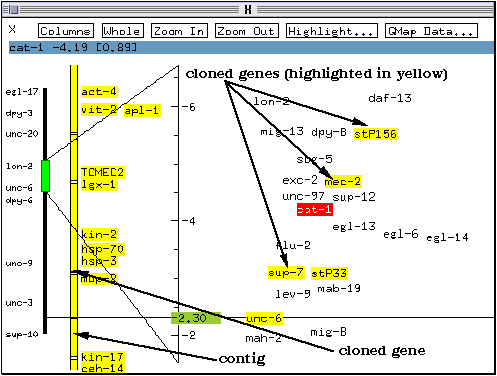
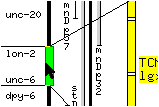
The yellow bar with small bands immediatly to the left of the scale bar represents the connection with the physical map. In this case the bar is continuous and covers the whole chromosome because the physical map for this chromosome is complete, and all the clones have been joined into one continuous contig (a contig is an assembly of overlapping clones).
On colour systems, some marker names are highlighted in yellow (e.g. sup-7, stP33). They represent genes which have been cloned and have been assigned a position in the physical map as well as in the genetic map. These markers act as points of reference to anchor the physical map and the genetic map together. The bands on the contig bar correspond to these markers.
* Double-click on the contig bar on the band corresponding to the marker stP33 (indicated by the `cloned gene' arrow in the above figure).
Note: as the band is clicked, the code RW#L33 appear at the top of the window, highlighted in blue. This is the name of the clone in the physical map containing the marker stP33.
This opens a new window displaying the physical map for this region of the chromosome.
return to Table of Contents
next section: The physical map